Thursday, January 8, 2015

Sweet Potato, Apple, and Ham Breakfast Hash


I'm not normally a breakfast person, and for the most part I don't think Spens is either.  The last several months our eating habits have been borderline terrible so we decided to do another Advocare 24 Day Challenge.  

We started earlier this week, so the first thing I did was plan our meals...boyfriend approved.  I like to pick breakfasts first since they are the hardest meals for me to want to eat. I'm not a morning person at all.

Since I have so much free time right now, I of course started playing on Pinterest.  I found several breakfast recipes that were like a breakfast hash, but not many included a serving of fruit.  Until I found one recipe that had apples.  I love cooked apples.  

From there, I just ran with it.  This recipe is completely clean, paleo, Advocare approved, and (my favorite) gluten free.


Funny story - Spens doesn't have any type of peeler.  I tried to use a knife to peel the skin off one of the sweet potatoes.  It worked but it drove me nuts. and I gave myself a blister. not joking.  Needless to say, I did not peel the other potato.

I doubled the original recipe so that it fed Spens and I for breakfast for four days this week, making 8 servings.  After it was all cooked, we separated them into individual containers so that in the mornings we could just zap it and go.

So. fricken. good. and easy.

I'll definitely be making it again next week.


You'll need:

1 T EVOO
half an onion, diced (yellow)
1 lb honey ham
2 sweet potatoes, diced - peeling is up to you
2 apples, cored and diced
4 eggs
cinnamon
Makes 8 servings.


THAT'S IT! Super basic, super easy. Did I mention delicious?!


Directions:
1. Heat oil on medium in a very large skillet; add onion and cook about 4-5 mins.
2. Add sweet potatoes, ham, and apples.
3. Cook about 10 mins,  covered and stirring occasionally.
4. Add eggs. You can whisk before or not.  I didn't, but I had to mix a lot more than if I whisked them first. I wanted less dirty dishes.
5. Cook until eggs are finished and potatoes are soft.  I think mine was another 10-15 minutes.
6. Add cinnamon - I added the size of a quarter in my palm.  Some people like subtle flavor, some like strong cinnamon flavors.  This amount is completely up to you.  The quarter amount yielded a nice, subtle compliment to the sweet potatoes and apples.


This is so good and a great base for any other hash you might try! 

I hope you give it a try, and please let me know what you think!!


Tuesday, January 6, 2015

Top Golf is the best golf!


I've tried golfing several times in my life.  I'm beyond terrible, which I normally can't stand because I don't like to be bad at things, but I honestly just don't care.

I'm so bad at golf, I've settled on being the cart driver for the rest of my life.  I think a lot of it has to do with the hidden bag of wine.

Yes, I did say bagged wine. no guilt here.

That being said, there is a type of golf that I do enjoy. a lot. It's Top Golf.  Honestly, it's a great time regardless of your level of skill.  Sometimes I hit the ball, sometimes I miss it.  Either way, I always have fun.

We went last week and I finally remembered that they have a gluten free flat bread for their pizzas! Every time we go that's what I say I'm gonna order, but then we get there and something with gluten catches my eye and I completely forget about my safe option. 
My understanding is the gluten free flat bread can be substituted for any of the flatbread pizzas.  This time I chose Pepperoni and Sausage.  I don't think it's flavored with anything fancy, but they've nailed the gluten free crust.  It's a thin crust, which I always like.  It's not too crispy or too soft and has a good (almost like normal crust) texture. If I hadn't ordered it, you would have to tell me it's gluten free.. and that says a lot.

It's also cheaper than other gluten free pizzas I've tried. cheap + delicious is a win in my book any day of the week.

I didn't remember to snap a pic of it until half way through the pizza because it was that good.  

excuse the iPhone pic

Also pictured is my margarita.  I created my own - 1800 reposado, strawberry mint sangria swirl, with cointreau.  Heaven in a glass.

We also ordered Mushi, which I don't think is gluten free but still tastes really good. I limited myself to two slices...this time.  The best description I can give is that it's like Mexican food as sushi.  It's a jalapeño tortilla wrapped around sticky rice, drunk beans, spicy chicken, and cheddar cheese.  Oven baked and topped with sour cream, avocado, and sriracha hot sauce gives it a nice crispy outside with just the right amount of spicy. I mean, it definitely has a kick to it, but even though I like spicy, I'm a big ole baby when it comes to it.  Like "pass the margarita to soothe my mouth, please" as I simultaneously reach for another slice.

You can sit in the bar area to eat and drink or you can get a bay to play golf.  Your best bet for a bay is to take a group with you so you can split the play time.  That's the most expensive part and adds up verrrry quickly.

Houston friends - there's a location in Katy and in Spring! 


From what I can tell, menus vary a little with each location.  Regardless of where you're from, take a look and see if there's one close to you! You won't regret it!


Monday, January 5, 2015

Fielding's Wood Grill


On Friday we found ourselves running lots of errands. One of which put us in The Woodlands - we had to clean out our storage unit... the one that has had leftover work trash in it for three months. 

Yes. We've been paying for our trash to stay warm and dry. So stupid.

Anyways, I knew Friday would be Cleaning of the Storage Unit Day. BUT I was surprised when I woke up and Spens had already decided on lunch. In The Woodlands. At Fielding's. It's about a 25-30 minute drive for us, but the food has always been so good, we've never minded.

Needless to say, I wasn't even a little bit upset.

Fast forward to getting there and ordering. We met a couple friends, so we ordered the Serrano Pineapple Salsa to share.  I'm not sure what the chips are made of (I didn't think to ask).  Even though it tasted delicious, I found myself wheezing.  still worth it.

I ordered the Bayou Burger on a house baked gluten free bun.  It was a "burger" of shrimp that tasted like I was back in Louisiana.  The bun was a little bit dry feeling, mostly because it crumbled, but was still a really good alternative bun. Besides the shrimp "burger", it had andouille sausage, creole spices, the holy trinity (onions, celery, and bell peppers), tomato, and garlic remoulade. I would definitely order this again.  SO GOOD!  

Spens ordered the Smoke Burger, also on a house baked gluten free bun...so that we could split our burgers in half and share them.  He's so good to me.  
Back to the burger...it had the burger with bacon (no surprise), provolone, dried tomatoes, grilled onions, fried egg (double win), truffle bacon mustard, and lettuce.  I think because of the fried egg, this bun didn't taste dry at all.  It actually collapsed and made the burger all the more messy and delicious.  We both thoroughly enjoyed it! Spens didn't even mind the gluten free bun!!

We also ordered Truffle and Parmesan Fries. Probably not gluten free, but I had no reaction. that may just be my own body's weirdness.

I usually order their Dublin Dr. Pepper, but my body has been rejecting sodas, so I passed this time...Spens didn't. He looked like he enjoyed it. 

Overall, the food is delicious and I highly recommend everything.  I've been there a couple times and they haven't had anything I didn't like! 

That being said, if you are on a budget, they are pricey for burger and fries.  
But it's so good and if you're already going to treat yourself, I definitely say make the drive!

Next time, I think I'm going to try the Blood Mary flight :)


Been here before? What did you order?!

Saturday, December 20, 2014

Tomato Bisque


This was delicious! My boyfriend and I finished the whole pot!

I was craving a grilled cheese so of course I needed a tomato bisque.  I found this recipe from a simple google search and as usual, I made it a little bit of my own...mostly because I used what was in my house already. shhhhh!


You'll need:

2 1/2 lb. plum tomatoes, cut lengthwise
1 1/4 t kosher salt, or more to taste
ground paper to taste
1 t EVOO
1 sm yellow onion, chopped
3 cloves garlic, minced
1 t paprika
1 c water
optional garnish - sour cream and/or chopped parsley


Directions:
1. preheat oven to 425F. Cover a large baking sheet with aluminum foil.
2. arrange the tomatoes with the cut sides up on the baking sheet.  it's ok if they touch.
3. sprinkle a teaspoon of the salt evenly (as best you can) across the tops. sprinkle ground pepper.
4. roast tomatoes in the oven for about 30 minutes, they should be soft but keep their shape.
5. in a large saucepan, warm the EVOO over medium-hi heat. 
6. add the onion and garlic and sauté about 3 minutes.
7. turn down the heat to low and cover for about 8 minutes to cook.
8. add the paprika.
9. raise the heat back to medium-hi, add the finished roasted tomatoes and water.
10. reduce the heat to medium, cover and simmer for about 25 minutes, stirring occasionally.
11.  pour contents of saucepan into a food processor and blend until smooth.
12. rinse the sauce pan and pour the contents of the food processor back into the saucepan.
13. add in the remaining salt, plus more if needed, and pepper to taste.
14. reheat soup to medium heat.
15. serve (+ garnish) and enjoy :)


Hope you enjoy it!
What's your favorite soup + sandwich pairing?


Thursday, November 20, 2014

Fried "Grilled" Cheese


The last week or so in Houston has been pretty cold. I like cold weather clothes, but I hate being cold...so I've been pretty conflicted.

One day last week when I probably should have been studying, I was instead watching Food Network.  It was some type of Anne Burrell show and she got me when I heard her say Fried Grilled Cheese.

Fried. Grilled. Cheese.

I'm still in shock at how delicious that sounds.  I told my boyfriend that I wanted to make it and he told me I'm ridiculous...but I made them anyways.  And he loved it. 

This is your basic grilled cheese sandwich, but instead of just slapping on some butter and then pan frying it, you literally fry it.  But after you treat your bread slices like french toast. 

It's heaven.  And because of the cold weather I mentioned, I decided I also needed a tomato bisque to go with it.  This is my new favorite meal!


That's 3 slices of cheese (above), versus two slices of cheese (below).  Hint: go with the three slices of cheese! Trust me.


I used my loaf recipe from earlier this week.  I feel encouraged to make a loaf of bread at least once a week so that I can always have this bread and these sandwiches on hand. 

Here are some tips
1. I used block cheese that I cut slices off of - partially because it's cheaper, and partially because it's easier to control. 
2. I also learned through trial and (I'm not counting it as because they still tasted good) error, that it's better to fry them for about 20-30 seconds and check them then to just let it go and fry and crisp them. Granted, if you like yours super crispy and kind of brown, then you'll want to fry for longer.
3. Have a plate with a napkin on it ready for when the frying is done to absorb any extra grease.
4. Tongs are amazing. and also the tooth picks. without the tooth picks, the top crust floats on it's own. Learn from my mistakes.
5. I liked using a pot because the grease didn't pop at me as much.

Gather -
plate with a double napkin layer
wooden spoon
tongs
two toothpicks per sandwich
~2T butter melted in a bowl
a handful of Namaste Foods Perfect Flour Blend in a separate bowl
two slices of bread
block of cheese - I used colby jack
vegetable oil

1. pour your oil into your pot/pan and begin heating at about medium high - I poured enough to be about 1/4" - 1/2" so that the lower slice of bread is mostly submerged in the oil.
2. take one slice of bread and coat both sides with flour.
3. from your block of cheese, cut 3 slices of cheese, about 1/4" thick. 
4. take the same slice and coat both sides with butter, then place sliced cheese on top
5. take your second slice of bread and coat with flour, then with butter.
6. make your sandwich and put two toothpicks at opposite corners of the bread slices.
7. check your oil - place the bottom of the wooden spoon handle in the oil. if it boils, your oil is hot enough! 
8. take your tongs and ever so lightly place your sandwich in the oil. it will immediately begin to boil and sizzle and make your mouth water (if it's not already).
9. after about 30-45 seconds, depending on your preference of doneness, take out the toothpicks and flip the sandwich over.
10. place toothpicks back in if you want - I did this, but I'm not positive it's absolutely necessary. can't hurt to do it anyways.
11. once done, place on your napkin/plate, then flip over to absorb the other side's oil.
12. place on serving plate and enjoy!


Fun Fact: my boyfriend said if he wondered if he loved me before, he would know for sure that he does now.


Let me know how it goes for you below!


Tuesday, November 18, 2014

I Loaf U


One of the things I crave the most is a sandwich.  You name it, and I want it.  Sometimes, it's even the ones that I've never liked before, but the fact that it's wedged between two slices of bread...winning.

Thank you, Pinterest

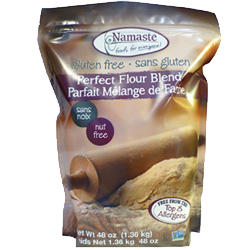
I've experimented with several of the box options but my favorite loaf has been Namaste Foods Perfect Flour Blend.  More importantly, it's also been my boyfriend's favorite loaf (who is not gluten frustrated).

Namaste Foods Perfect Flour Blend has been great for cupcakes, breads, cakes, cobbler...I'm currently manipulating a gumbo recipe.


I really like this flour.  I know this because I've been using it since an old roomie mailed it to me as a gift she found at Home Goods, over a year ago.  Side note: she's one of my favorites.

Pros: It's on the cheaper end of the gluten-free flour pricing spectrum, which is always an added bonus.  Pricing is competitive amongst the internet, so no fears if you don't have a Home Goods around you! AND The diversity...I mean, don't those anniversary cupcakes just look delightfully normal?


They were better than normal, fyi. best. cupcakes. ever. (the heath bar and ganache helped)

Con: (notice I only have one) My gumbo recipe is a bit on the blonde side, and extra thick when at room temperature.  Not really an issue to me, though, because it still tastes really good.

Convinced? Cool. Get it here.


As for the recipe I use...

Gather -
3 1/2 Cups Namaste Foods Perfect Flour Blend
1 1/2 cups milk
3 eggs (room temperature)
1 T cider vinegar (apple cider vinegar totally works)
2 T oil (vegetable is what I generally have on hand)
2 T honey
1/2 Cup cornstarch
2 t salt
1 T rapid rise yeast
1/4 C warm water

Steps - 
1. Mix yeast in warm water and let sit for 5 minutes.
2. Warm the milk (I've used the microwave - about 30-40 seconds)
3. While that's in the microwave, beat room temp eggs in stand mixer.
4. Add milk, oil, honey, and vinegar to stand mixer.
5. Add yeast mixture.
6. Add dry ingredients to stand mixer.  I usually add some, beat it, add some more, etc.  Once all the dry ingredients are added, scrape bowl and mix again (do this a couple times until no fluid is resting at bottom of bowl).
7. Grease metal loaf pan, pour dough into pan.
8. Cover loosely with sprayed plastic wrap and let rise for about an hour in a warm place.  (30 minutes will work, but the final product is lighter if you let it rise closer to an hour)
9. Preheat oven to 350F.
10. Remove plastic wrap and bake for 30 minutes.
11. Cover with tin foil to protect the top of the loaf, and bake for another 35-40 minutes.  *bake for 35, check if dough is done using a toothpick/knife, continue baking at 5 minute increments as necessary*
12. Let cool on a rack before slicing. <-- really difficult, but worth the wait.


I hope you enjoy it! 
Check back later this week for my Fried "Grilled" Cheese recipe.


Monday, November 17, 2014

Quick Fix...Chocolate Chip Cookies

Break and bake cookies? Pass. 

While break and bake cookies' purpose is convenience, the amount of them that I would consume in one sitting is absurd.  Pay no mind to the fact that my body can literally NOT digest them. 

Within minutes I am literally in an obscene amount of abdominal pain.

But that's not why I'm writing this post.


I have found an even easier quick-fix! One that doesn't break the bank, or your tummy.
Don't believe me? Keep scrolling.

Meet Udi's Gluten Free Soft & Chewy Chocolate Chip Cookies.


Kept in the freezer section, these babies are appropriately named once popped in the microwave.  I am not a fan of them at room temp. They remind me of Chips Ahoy!, which I really have never been a fan of (please don't judge me). But, if you're into that...that's an option, too!

The ones that I don't eat remain in this convenient little container in my freezer.
Fun fact: this container is also remarkably sturdy. 

So when I want a little sweetness but also to contain myself, these babies are my go-to!

Steps: 1. open top of container.
2. on a paper towel, place desired number of cookies.
3. microwave for 20-30 seconds.
4. Enjoy :)


**Also, try Udi's Brownie Bites!! Another personal favorite.